How to Fix Print Jobs Stuck in Queue: Quick and Easy Solutions.
A document caught in print queue can be among the most annoying issues you might run across. It not prints and even pauses every file in line behind it. Here’s how to clear print queue when traditional solutions won’t help to make the printer unstuck and document print. Here are some quick and easy solutions to resolve the issue:
1-Manual clearing of the print queue
Sometimes Manual cleaning of a queue proves useful.
The windows:
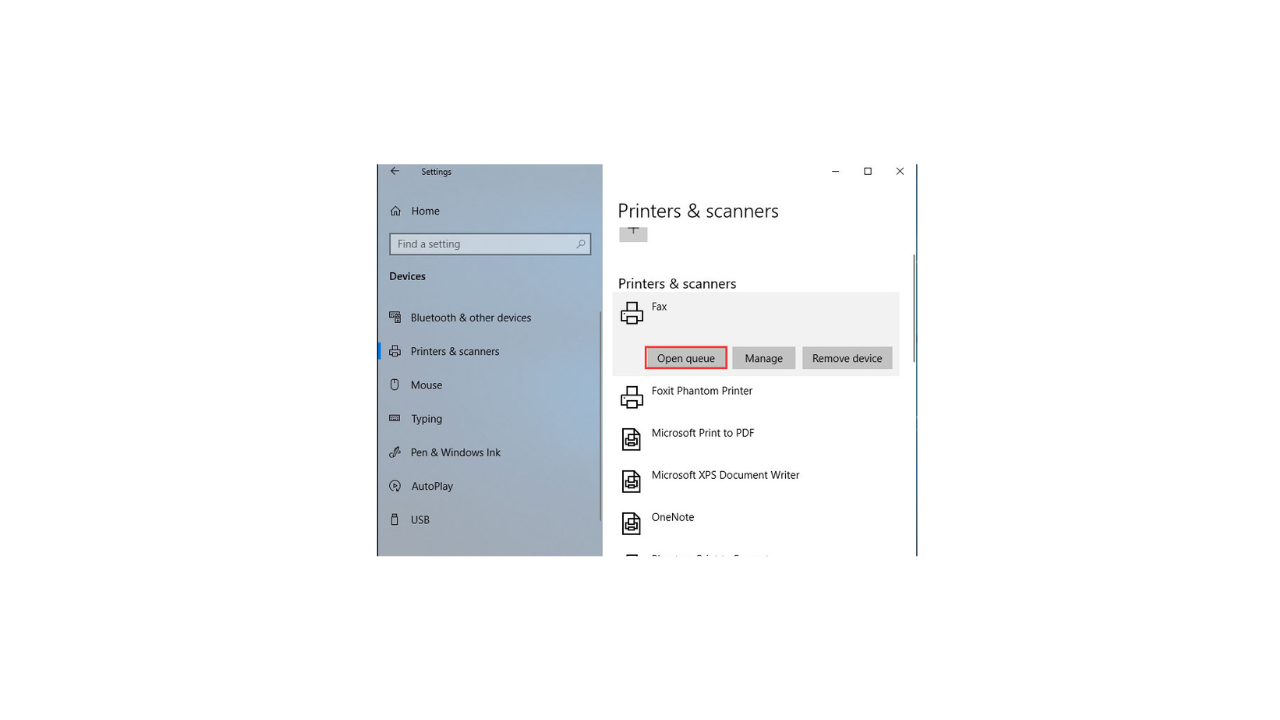
Step 1-Starting with Settings>Devices> Printers & Scanners.
Step 2-Choose See what’s printing by right-click your printer.
Step 3-click Open queue after choosing your printer.
Step 4-Cancel All Documents after clicking Printer.
The Mac:
Click System Preferences then visit Printers & Scanners.
Choose your printer then click Open Print Queue.
Click the job and choose X button for delete.
2- Restart the Print Spooler Service
All print tasks are controlled by the print spooler service. Starting it can usually help to free caught jobs.
The windows:
Step 1-Press Win + R; type services.msc press Enter.
Step 2-See Print Spooler among the service offerings.
Step 3-Choose Restart by right-click Print Spooler.

The Mac:
Step 1-Access the terminal openly.
Step 2-Press Enter after type sudo launchctl stop org.cups.cums.
Step 3-Press Enter after type sudo launchctl start org.cups.curs.
3-Remove Temporary Files
Clearing transient files possibly generating the problem.
The Windows:
Step 1-As detailed in step 1, stop the Print Spooler service.
Step 2-Go to C:\Windows\System32\spool\”PRINTERS.
Step 3-Empty the PRINTERS folder’s contents.
Step 4-Start the Print Spooler service.
The Mac:
Step 1-Open the terminal.
Step 2-Press Enter after type sudo rm -rf /var/spool/cups/tmp*.
4- Reinstall the Printer Driver
Older or corrupt drivers can create problems. New printer drivers are constantly being
released by printer makers to correct flaws and boost performance. Visit the website of your printer manufacturer (always in the Support or Download section) to obtain them and download the most recent driver then hand-install it.
The windows:
Step 1-Open Control Panel then visit Devices and Printers.
Step 2-Click Remove device after right-click your printer.
Step 3-Install the most recent driver from the manufacturer’s website.
The Mac:
Step 1-Visit Printers & Scanners after open system preferences.
Step 2-Choose your printer; click the – button to delete it.
Step 3-Install the newest driver from the manufacturer’s website.
5- Check for Printer Errors
Start looking for printer problems by looking at the display panel for any error messages or warning lights. Typical problems are low ink or toner levels, paper jams, and connectivity concerns. Verify the cartridges are correctly installed and that no paper is caught inside. For particular error codes, consult the manufacturer's website or the printer's handbook. Look also for any printer-related error alerts on your PC. Make sure the printer is hooked to your network or computer correctly. To clear any temporary faults and confirm that the printer drivers are current, restart the printer and computer.
6- Restart your printer and computer
Sometimes a basic restart clears problems by restarting the connection and wiping off any transient faults. Turn off and unplugs your printer. Starting your PC Once more turn on your printer and check if the problem is fixed.
These instructions will help you free print jobs caught in the queue and restore printer
performance. To reset the work queue, first start the print spooler service once more. If needed, manually sort the print queue and delete any troublesome files. Quickly fix printer problems including low ink, paper jams, or connectivity problems. To guarantee the printer driver is current and running as it should, reinstall it. For further control, use print queue management systems. To fix any transient problems, lastly restart your printer and computer. These steps should enable your printer to run fault-free once more.
